Simple Pillow

you will need:
A 8 1/2 x 14 inch piece of paper (or a measuring tape and sewing chalk)
Two large scraps of your favorite fabrics
A sewing machine
thread
scissors (fabric & paper ones)
Polyester stuffing
This is a fun easy project for any skill level!
I started out with a 8 1/2 x 14 inch piece of paper and pinned it to my desired Fabric (if you do not have this size of paper, just Measure this amount and mark it with sewing chalk or a pencil). after you have pinned on your "pattern" to the fabric, cut around the edges of the paper (like a pattern). After you remove the pattern from the fabric, measure 2 1/2 inches on the edge of the paper pattern and cut with your paper scissors. pin this strip of paper to your alternating fabric, cut 2. Now cut both of your 8 1/2 x 14 inch piece of fabric lengthwise 3 inches from the edge. Now you are done cutting! you should have two 2 1/2 inch alternating fabric strips and your now four pieces of fabric (that were originally two 8 1/2 x 14 inch pieces). . Now for more pinning! pin two pieces of fabric (now 11 inches & 3 inches) wrong side up to both sides of the alternating strip (also do this with the other 11 and 3 inch pieces and strip) Now sew where you pinned. Now you should have two pieces of fabric, both with a alternating fabric strip sewn into them. Now for the easy part! sew the two pieces of your pillow, wrong sides togeather; this will create both sided of your pillow. Leave a small opening wide enough for you do turn your pillow rightside out and stuff with the polyester stuffing. now sew up the small opening! you are done!!!
to learn how to make the flower, go to http://www.thediydish.com/2010/02/how-to-make-chic-pillows-thediydish-on-studio5/


NO-Sew Physic Paper!
O.k as I promised, here is my no sew physic paper tutorial. And for all you interested, the Grand-opening of my bow ties will be held..... TOMORROW July 13th! (Balloons fly and confetti explode and all of time and space will never be the same again....) Check back tomorrow for more information and links to
So in light of my (up and coming, soon to be open) Bow-tie section on my Etsy I am offering a few Whovian craft tutorials as a countdown until the Bow-ties Grand Opening (date will be revealed at second tutorial) This is a two part kind of relaxed soliciting act lol. But you will benefit by two free tutorials one (see below) "How to Make a Sonic Screwdriver Out of Household Craft Supplies" and the next one "No-Sew Psychic Paper" So stay tuned for more info and next tutorial:)
"How to Make a Sonic Screwdriver Out of Household Craft Supplies"
Use arrows on pictures to navigate tutorial.
Felt Food Fun
Hello All.
I haven't had an update for so long! School you know, keeps one busy. But I have had some time to make something fun with felt. I really enjoyed making this felt food. The Pop-tart is my latest project and I will have more pictures of a felt toaster and second pop-tart as soon as they are made. Unfortunately I have no pattern for this one for you guys to make yourself, but if you like this toy for kids you know I have the pancakes for sale on my etsy below and more coming soon!
I haven't had an update for so long! School you know, keeps one busy. But I have had some time to make something fun with felt. I really enjoyed making this felt food. The Pop-tart is my latest project and I will have more pictures of a felt toaster and second pop-tart as soon as they are made. Unfortunately I have no pattern for this one for you guys to make yourself, but if you like this toy for kids you know I have the pancakes for sale on my etsy below and more coming soon!
Visit My New Etsy Shoppe!
Hi everyone! I'm SOOO excited to announce that that me and my sister have opened a shop on Etsy! We are currently selling hats and pet portraits, but hope to put even more up there soon! please visit our shoppe at https://www.etsy.com/shop/TwoPaintedPockets?ref=search_shop_redirect
How to make a hoverboard necklace
This is for all the back to the future fans that like crafts.
This is what you will need:
1) A teck deck board
2) The Hoverboard decals (the button below will take you to the link to print them out)
3) A ball point chain (or other chain)
4) Hot glue gun (and hot glue)
5) Silver duck tape
6) Electrical tape
7) A piece of pink paper
8) An earring head pin (or really big jewelry loop)
9) Jewelry pliers
10) A potholder weaving loop (or a hairband or yarn) must be pink
11) a foam circle (small) must be green
12) Con-tact adhesive for paper
13) scissors
14) A candle (and something to light it with)
15) 4 sequins (2 bigger 2 smaller (big ones should be about 1/2 inch)
12) About 30 minutes or so in time
Ok... that's a lot, but its easier to make then to get all the supplies:)
Here we go! (Just follow instructs in slideshow below)
Hi there!
Thought you might enjoy seeing my Halloween costume, and how to make it!
I dressed as an Andorian from Star Trek. I made the antenna from paper clay (you can get this from Hobby Lobby I think, or Dick Blicks) and painted them with blue paint. Then I hot-glued them onto a headband. The skin color is from Snazaroo face paint, you can get this on amazon.com or Dick Blicks. So fun! I liked being blue:) lol. Oh and if you are worried about having to dye or hair blonde for this look, don't. I used BBlonde, by Jerome Russel. You can get this at Walgreens for 4 bucks! Its great, but I wouldn't suggest it for anything but costume. Its sticky-ish and looks more gold than blond (unless you WANT golden hair) But it worked great for this. My Star Fleet uniform was made out of a Tee shirt from Hobby Lobby and I just airbrushed the black onto it. I'm sure you could use fabric paint of some sort of material safe spray paint if you don't have an airbrush! Enjoy the Pictures!
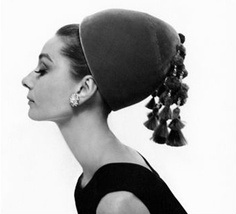
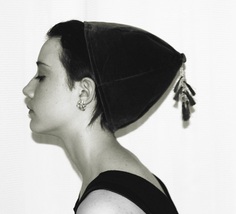
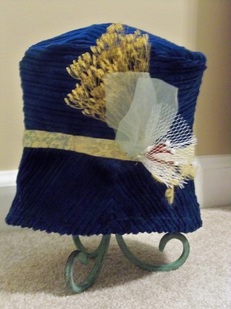
Audrey Style Jade Hat
This hat was a lot more trouble photographing than making lol. I used a Jade colored false velvet. I took the deerstalker pattern, (the hat part not the brims) and elongated the pattern quite a few inches. The Tassels are made by hand by me:) fun fun, but defiantly the most tedious part! The hat on the left is my inspiration. This hat was worn by Audrey Hepburn in a photo shot for Vogue in 1964.
|
|
Deerstalker 2
I had way to much fun with this hat. I know, I know, I've already shown you a deerstalker. But I just couldn't resist! This is the real thing, the true Death Frisbee (and if you don't know what I'm talking about watch BBC's Sherlock) I designed this hat right from the show, and I LOVE the result. I hope you enjoy the photo shoot I did:P Oh and don't forget to check out the tutorial to make your own, which if you scroll down, is a big pink button. Click it! Click it! you wouldn't regret it (although that sounds terribly suspicions, doesn't it.... oh well:)
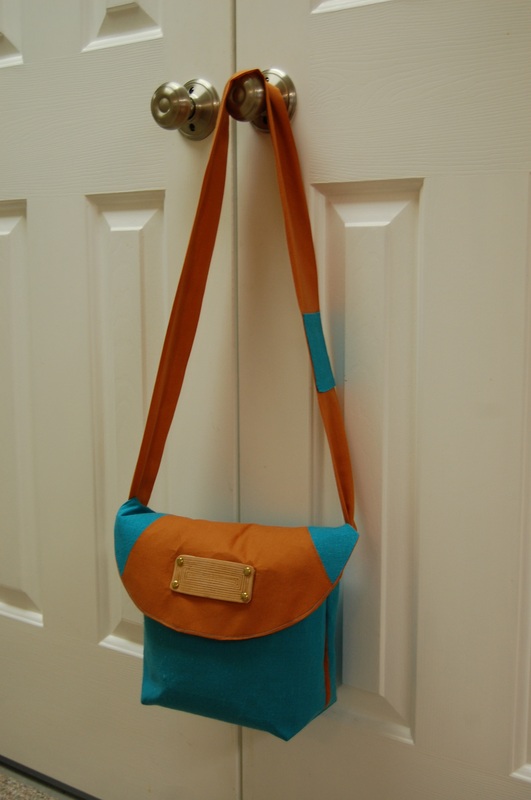
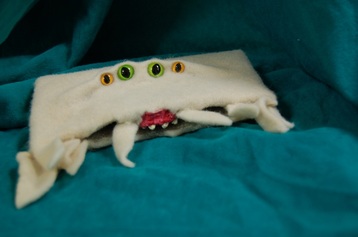
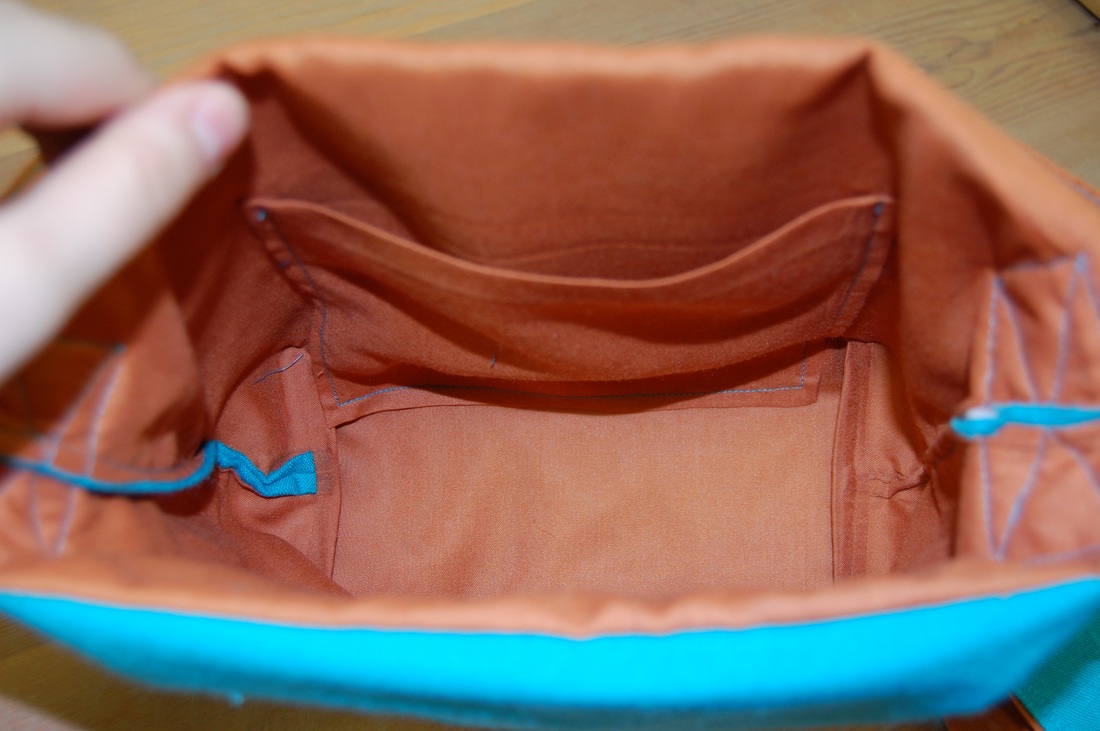
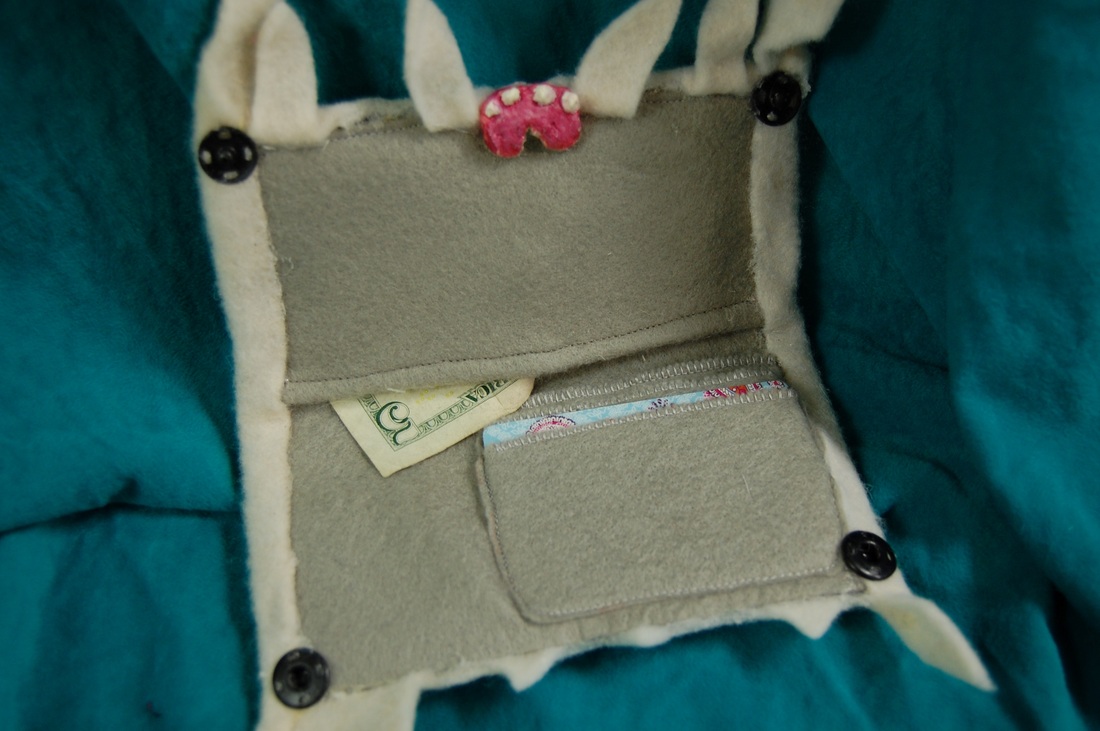
Cute Purse and Monster Book of Monsters Wallet
I decided to put these in the same categorize because, first of all, I made them about the same time, and second, both of them don't have a tutorial of this time. The purse I found on a tutorial online, but I don't remember the website (sorry all) Oh well, hope you at lest enjoy or are inspired by the pictures! (The Wallet is made out of a cheep check book covered in felt, in case you want to start one yourself:P
|
|
|
|
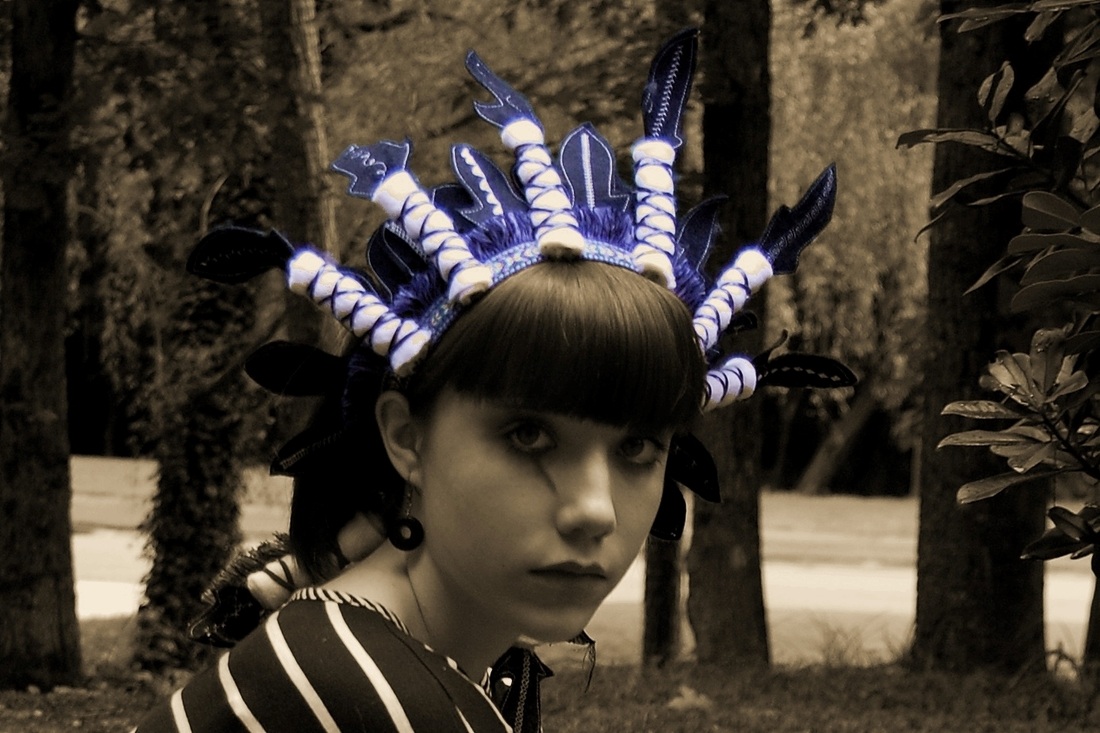
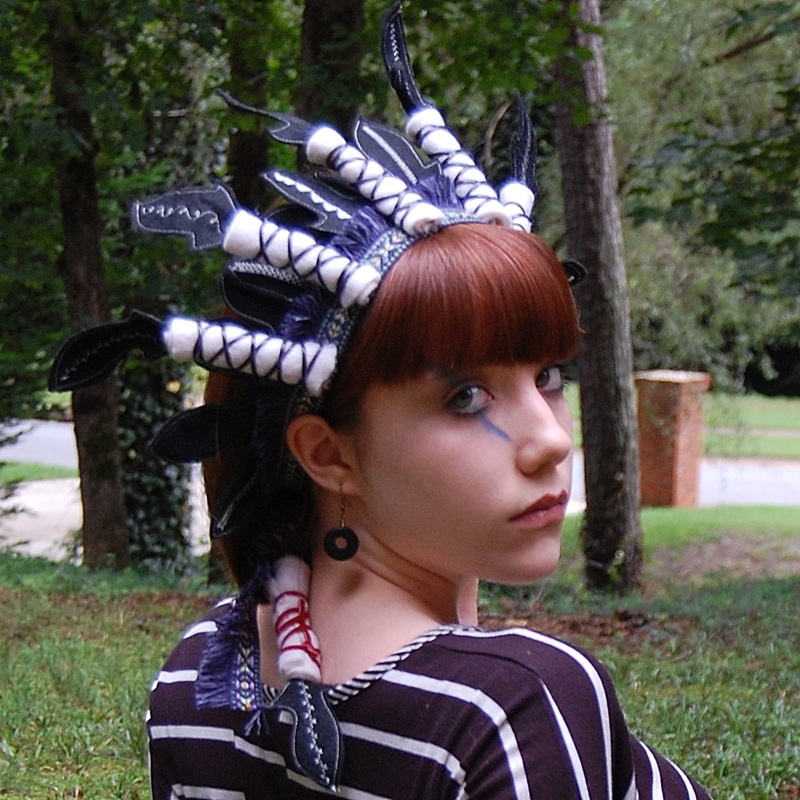
War Bonnet/headpiece
This piece was inspired by Native American War Bonnets. It had no pattern, I just added on to it as I went, and was so happy with the result! Each feather has its own sewn design on it--unfortunately you can't see that very well in the pictures :S
hope you enjoy!
hope you enjoy!
|
|
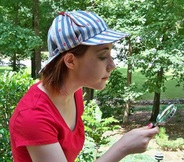
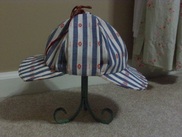
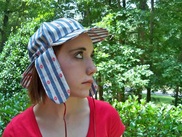
Deerstalker Hat
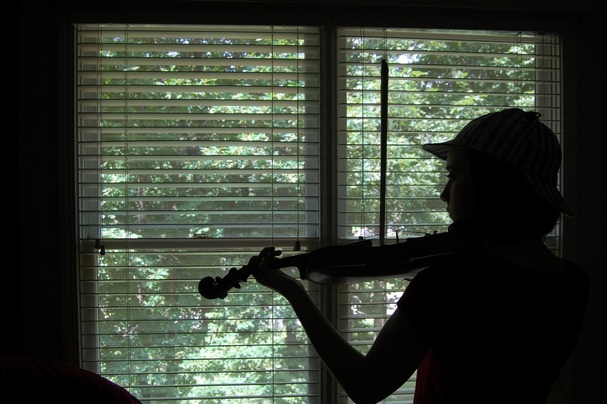
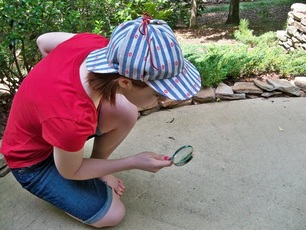
The Deerstalker; though it was never specifically mentioned by name in any of the original stories, it has none the less become one of the most reconcilable representations of Sherlock Holmes.
This was one of my favorite hats to make! I really enjoyed taking the deerstalker design but taking away the normal plaid element that averagely encompasses the make of it.
And just for you whom are still thinking "Is it a cap? why's it got two fronts?" I'll give you just a little background on the its functional and eye catching design.
Sidney Paget, the original illustrator for the Sherlock Holmes series is credited for making the deerstalker a prominent icon. The deerstalker is a cloth cap popular in the 19th century England, especially from 1870-1890. It was not acceptable wear in urban areas, and was only used in rural areas, mostly for hunting. Made of twill or tweed in a checkered pattern, the deerstalker was perfect for camouflage. Its fore and aft brims are ingeniously thought out, one to provide coverage for the face and one for the neck, the two side flaps of the hat can be tied under the chin for warmth in the winder or can be tied up at the top in a bow, which I personally think is cute and stylish;)
|
O.K I know what your thinking, "this is great and all, but how can I make my own? Well here you are, I found a great tutorial online, which is what I followed to make this hat. It has the pattern and everything, Enjoy!
|
|
|
|
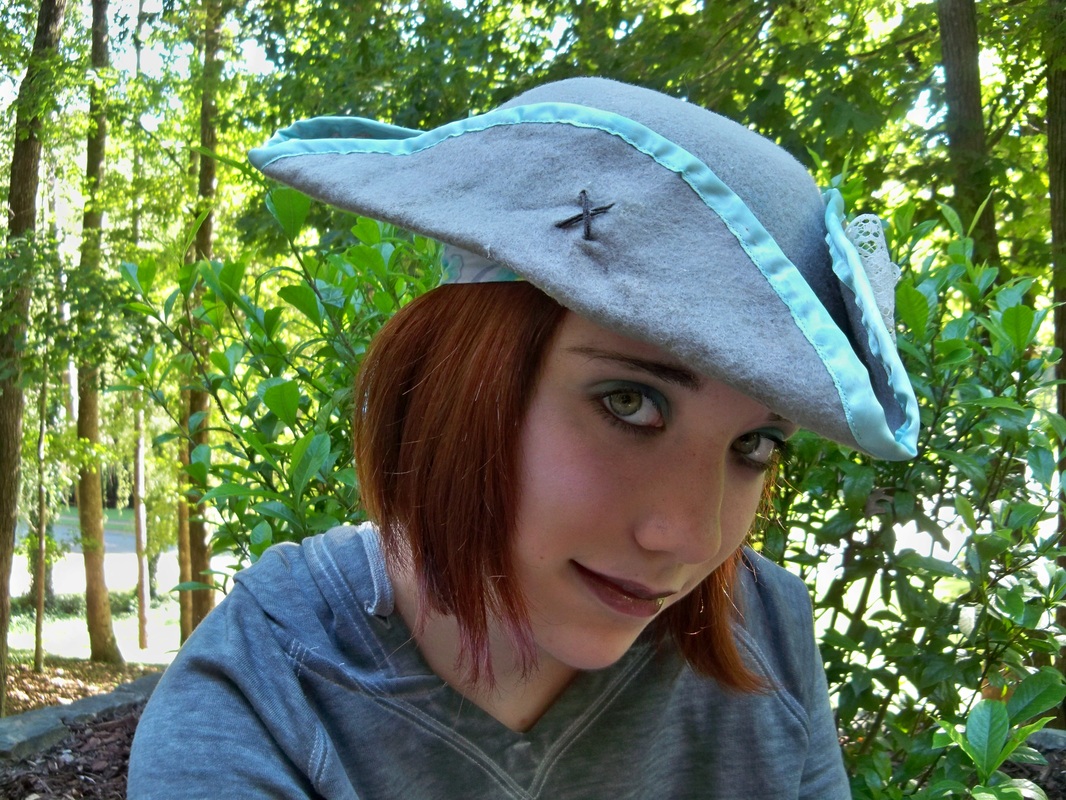
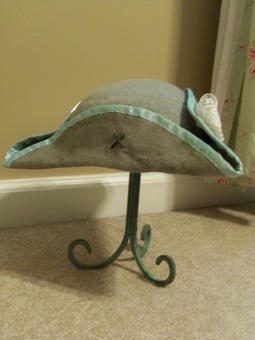
Pirate Tricorn Hat
I love the whimsicality of this hat. It took at little longer than some of the other hats, but totally worth it! This tutorial I used for the idea of the hat, along with Jack Sparrows original hat.
http://homemadeplayforkids.blogspot.com/2011/08/how-to-make-jack-sparrows-tricorn.html
http://homemadeplayforkids.blogspot.com/2011/08/how-to-make-jack-sparrows-tricorn.html
|
|
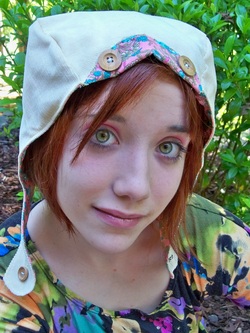
Generosity bonnet
This hat is my own original design:)
This hat is my own original design:)
|
|
Pilot/Aviator Hat
This hat was make from an inlarged copy of a small pilot doll hat I had on hand. It turned out pretty good for being a home-made pattern:)
Kiki and Coco in Paris Doll
|
|
When visiting one of my favorite blogs, Kojo Designs (see links
page) I found a really cute rag doll idea that said it was a knock-off of the Coco doll. The Kiki and Coco slideshow is adorable, and after doing some more research I found the maker of the doll, and decided to try to "copy" a version of the doll for fun :) below are the pics of my end result, vs. the original coco doll. Enjoy;) (Oh and this is the Slideshow on the left) |
My Doll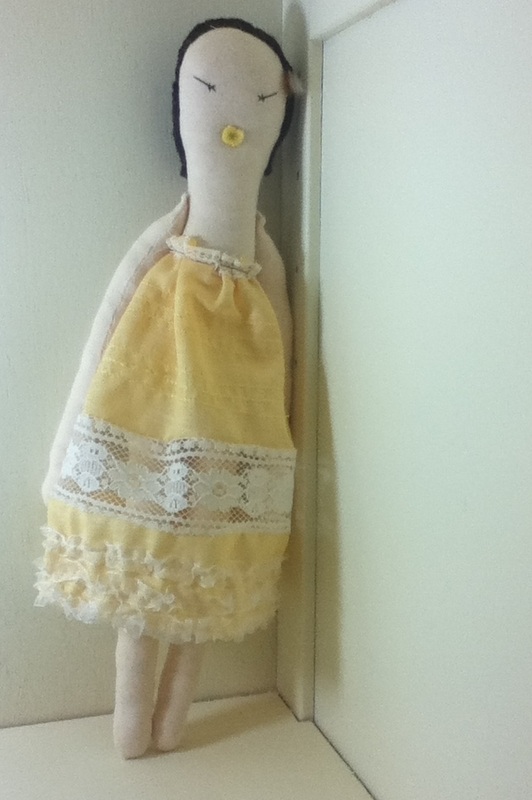
|
Coco Doll (Origanal)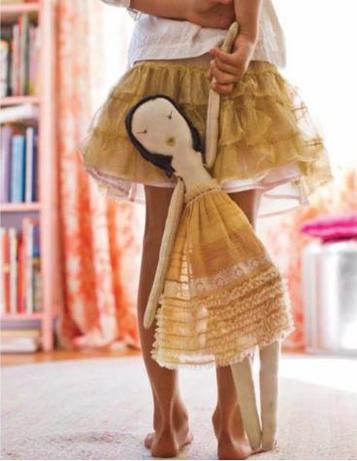
|
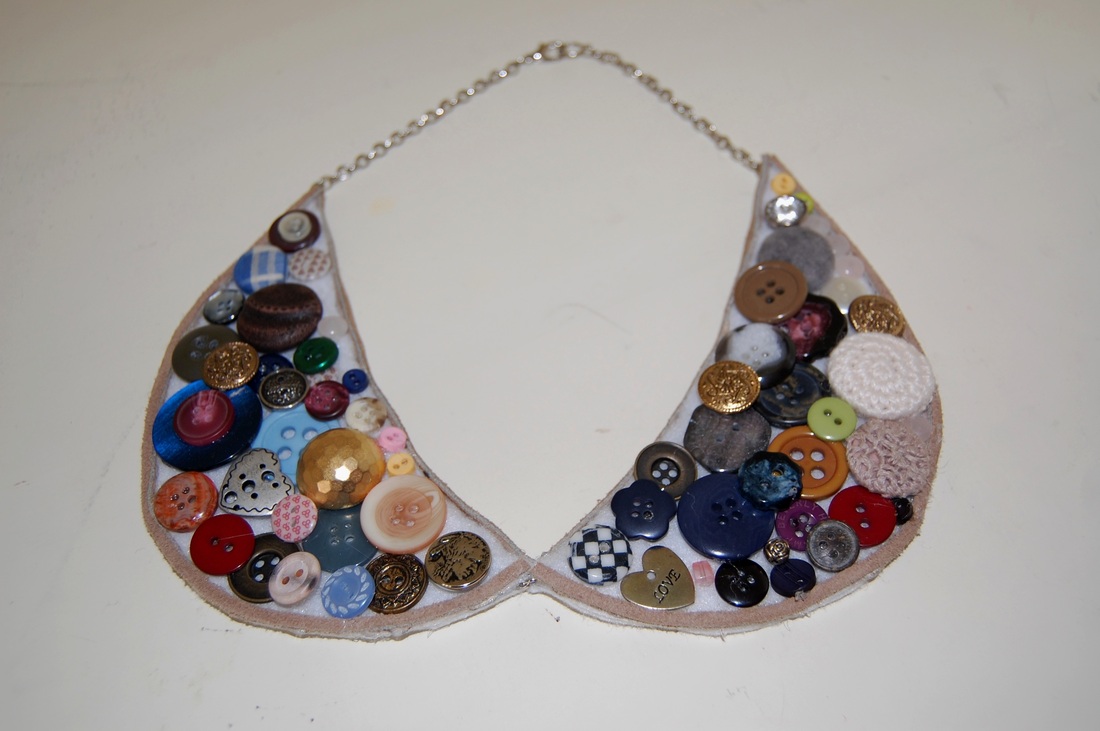
Awsomely Easy Button Collar Necklace
So I desided I wanted to try out making a collar necklace, but wasn't sure how hard it would be or how to make it! So I went online and found a Super Easy and fun tutorial that told me all I needed to know, and I made the whole thing in only about an hour. Enjoy and check out the link below if you would like to make your own!
http://www.theplumverbena.com/?p=1742
http://www.theplumverbena.com/?p=1742

|
|

|
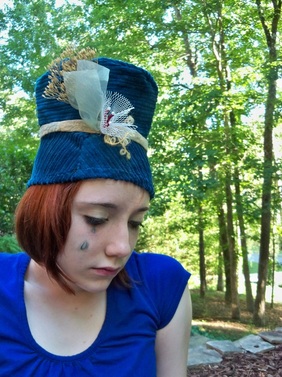
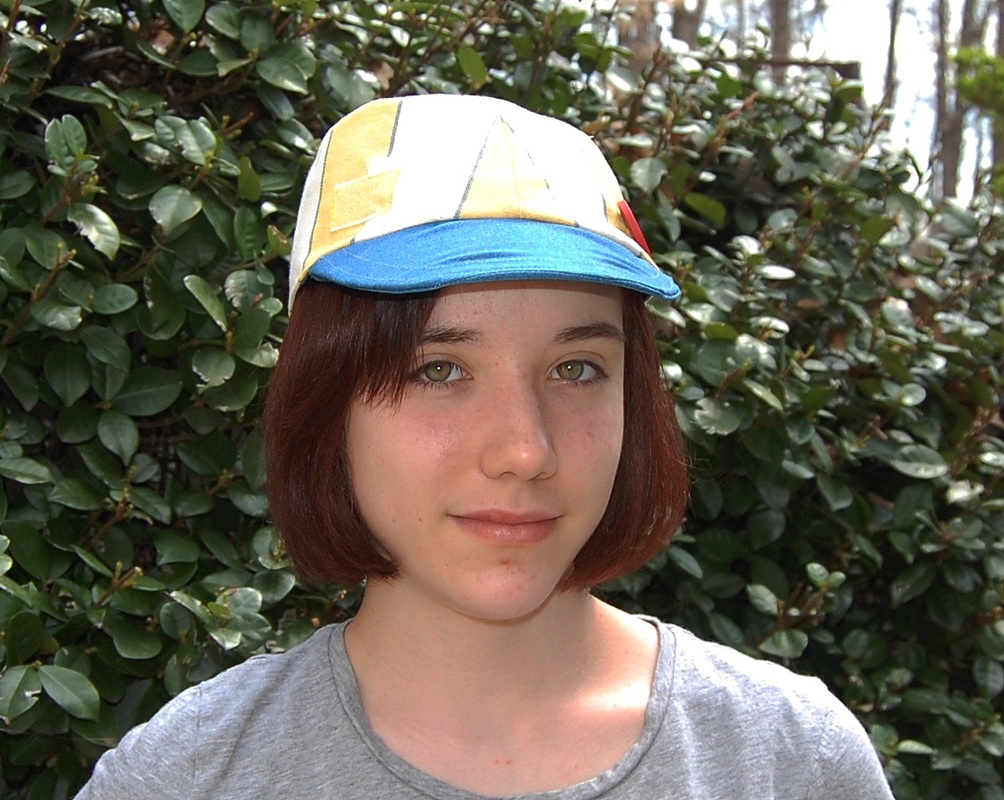
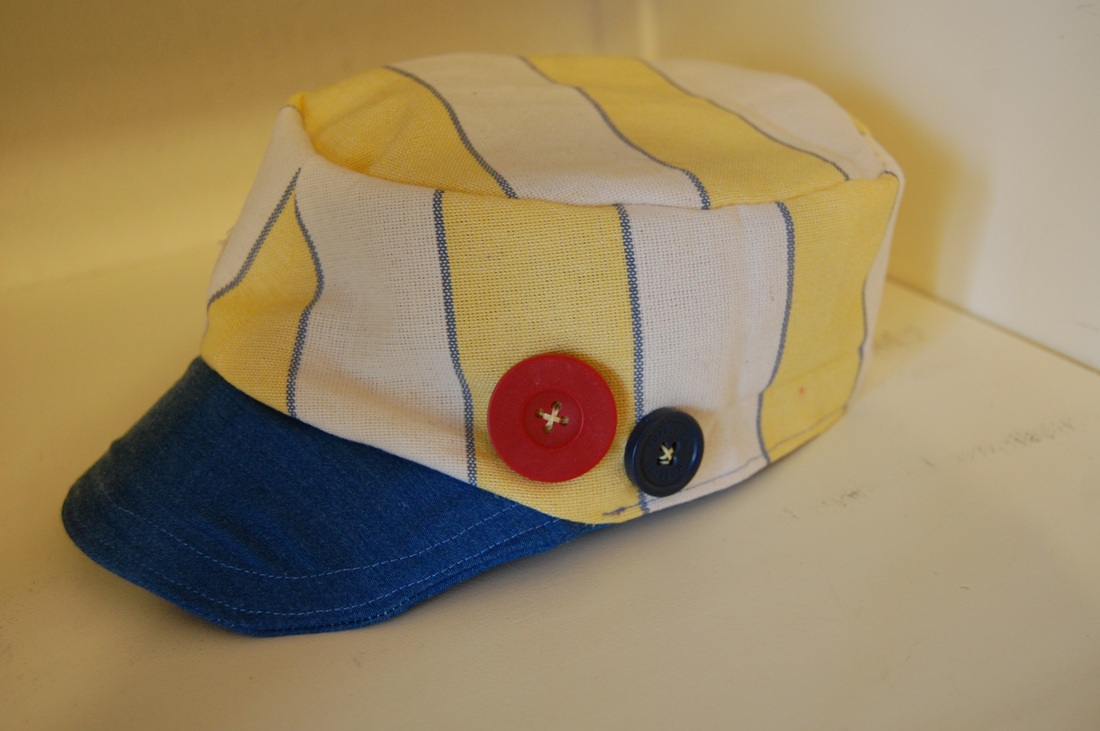
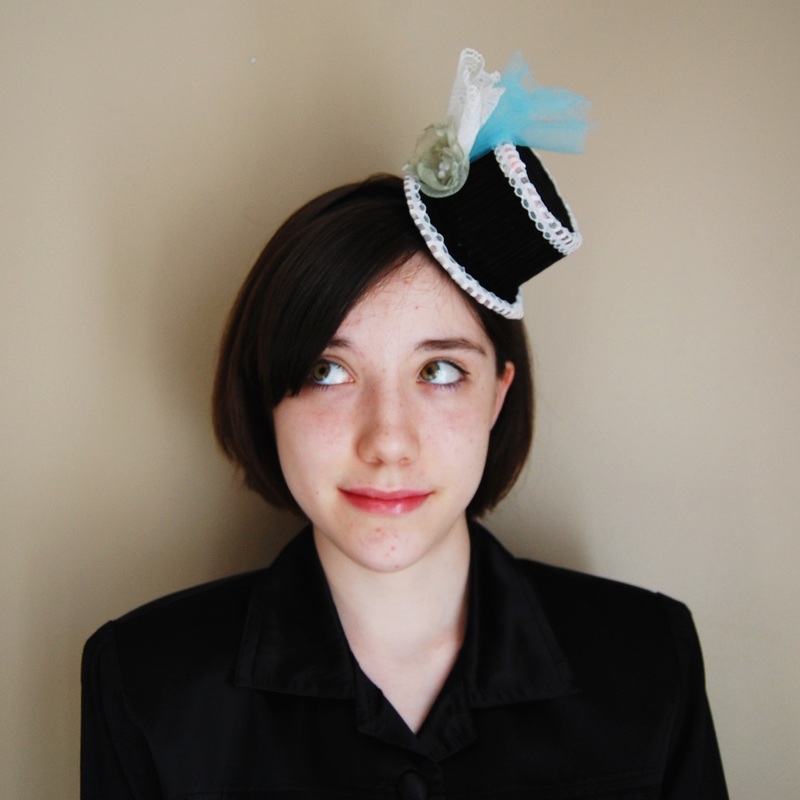
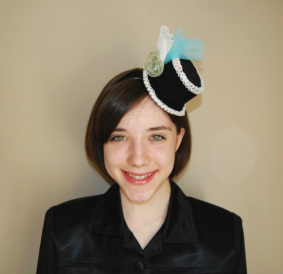
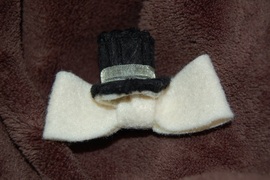
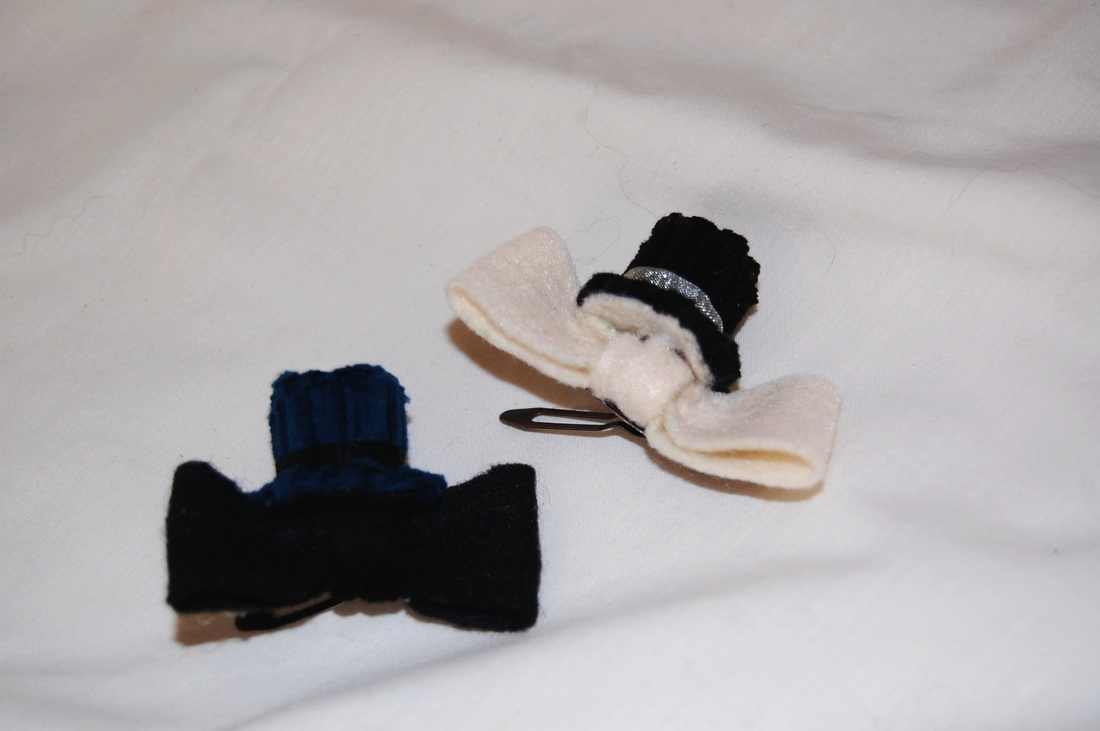
Super fun Military Hat
This is a great hat-prodject! I LOVE hats, and making my own has been much cheeper and way more fun than buying store bought ones:)
|
|
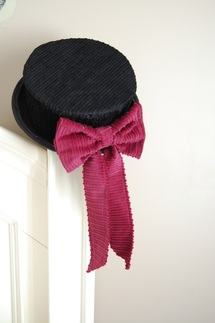
Top Hat Crazy
Here are a few pictures of some hats I made last weekend, hope you enjoy!
|
|
|
|
Bubble skirt
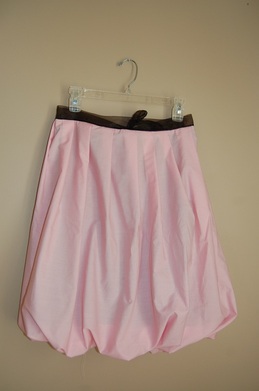
Made this bubble skirt just for fun, no pattern so I think it turned out pretty nice!
I love the pink and black togeather that makes it look ballet-like.
I love the pink and black togeather that makes it look ballet-like.
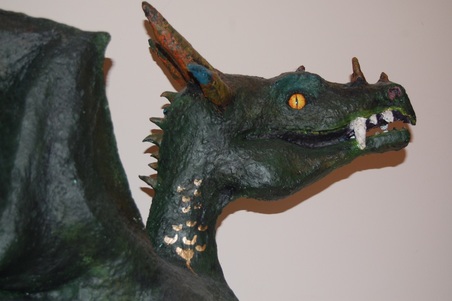
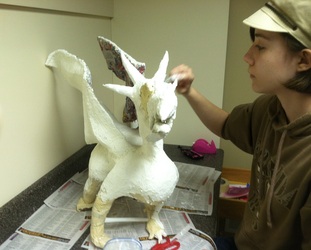
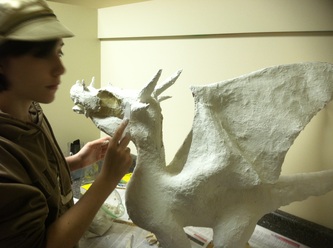
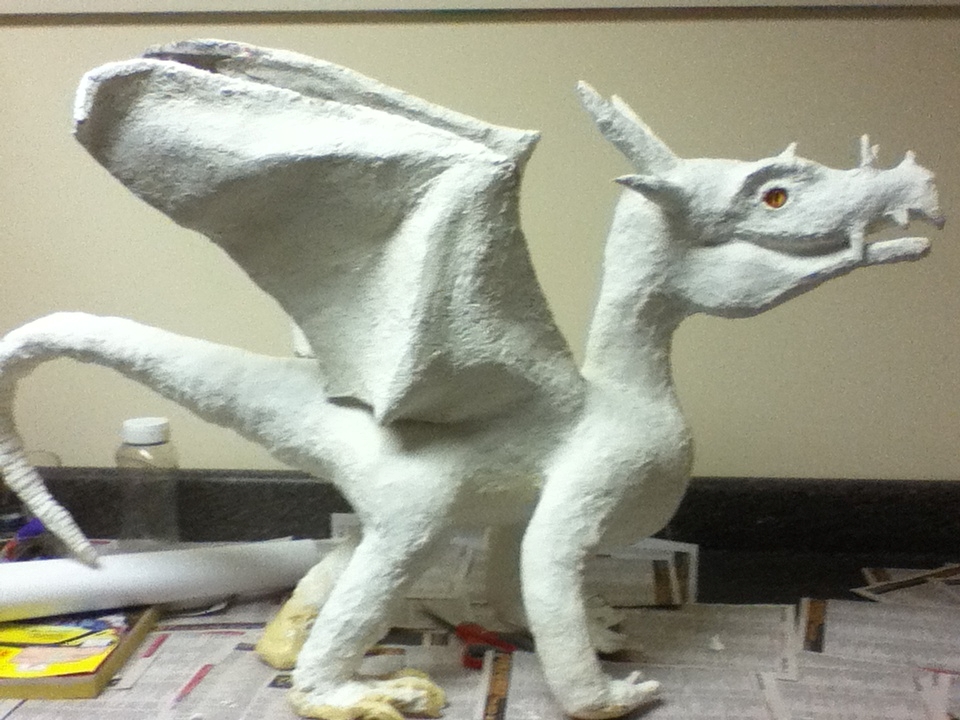
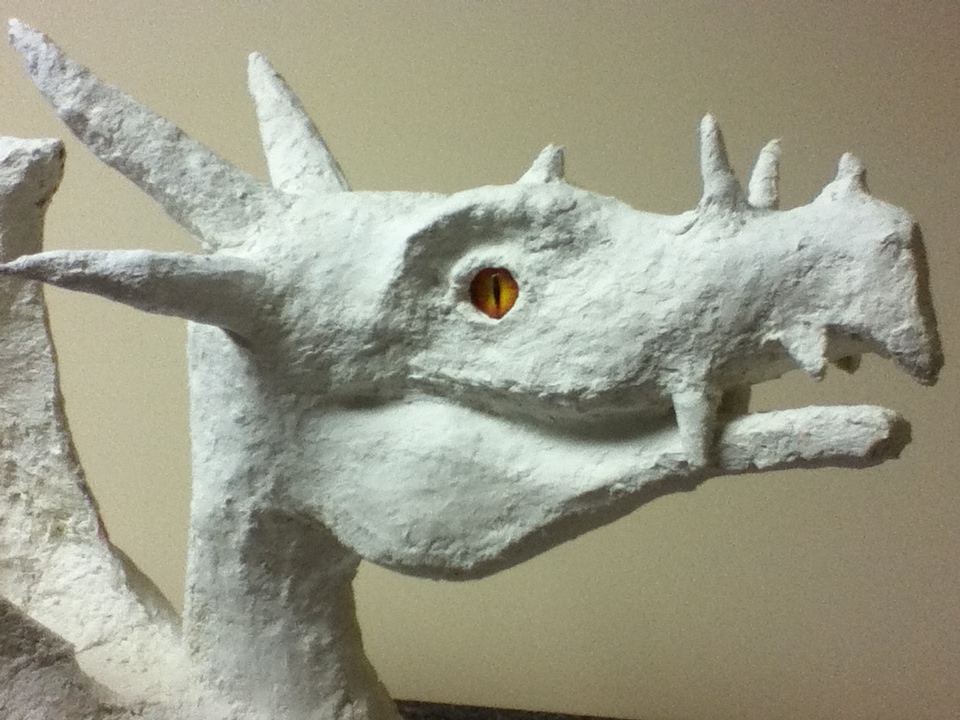
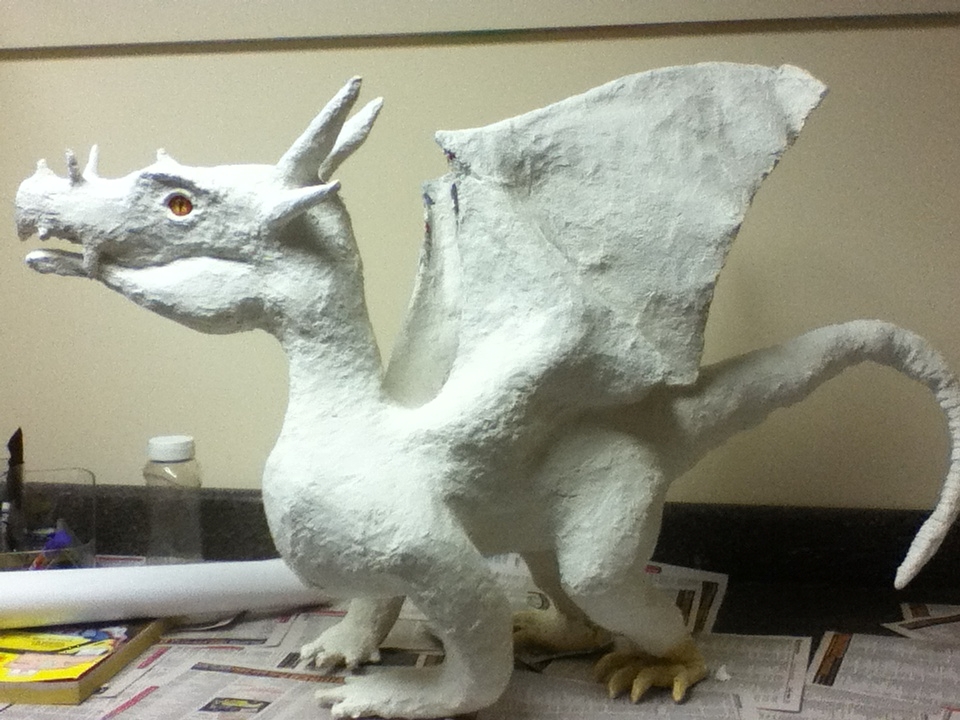
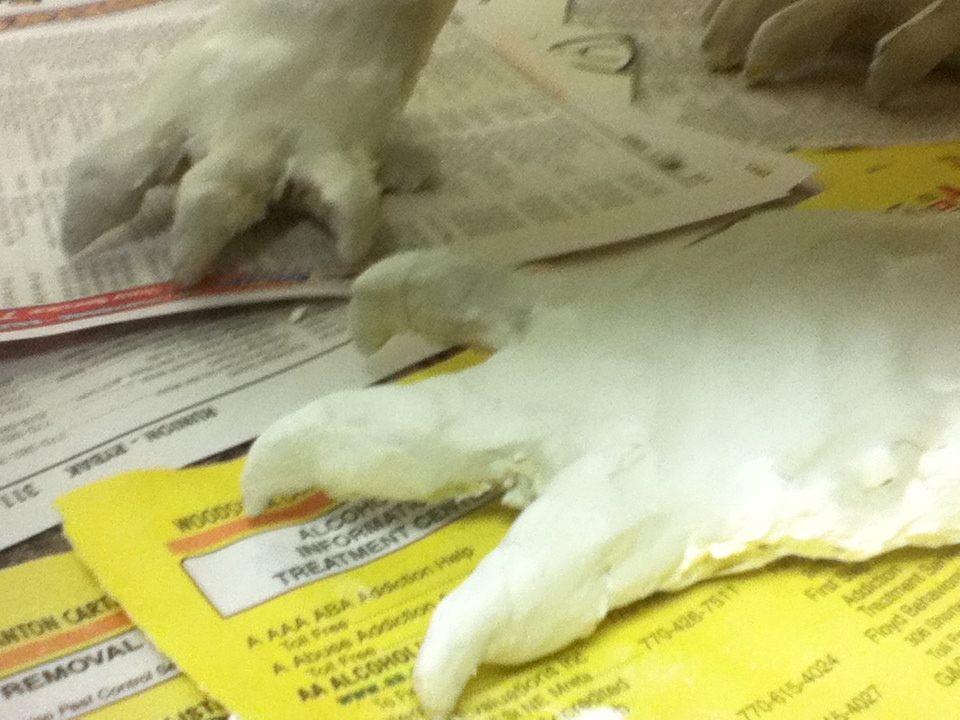
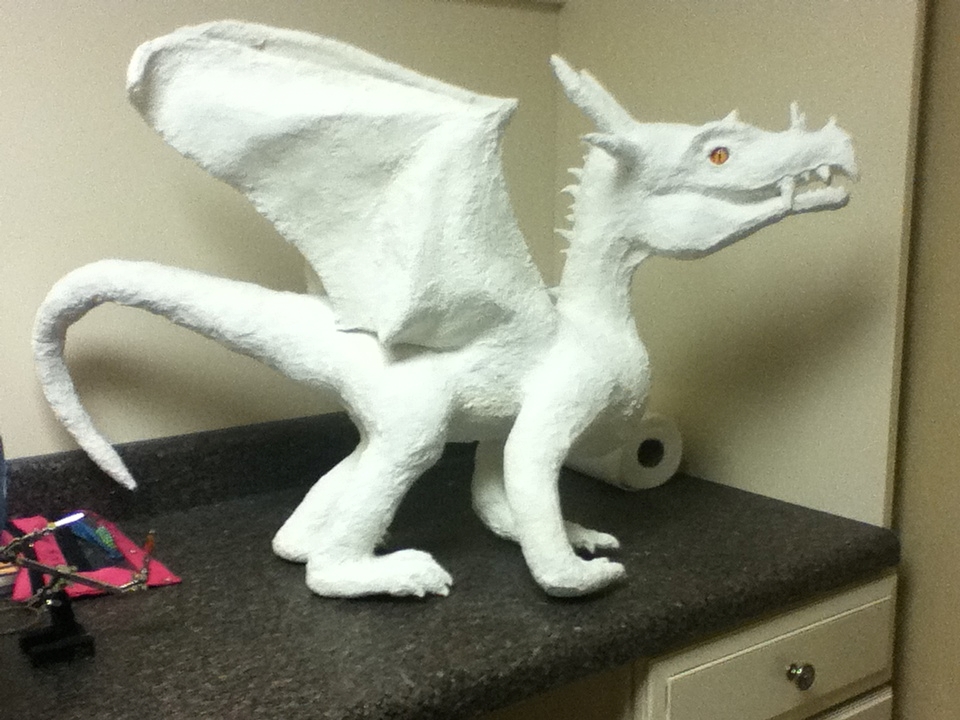
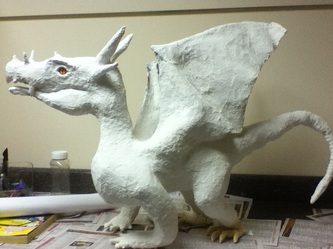
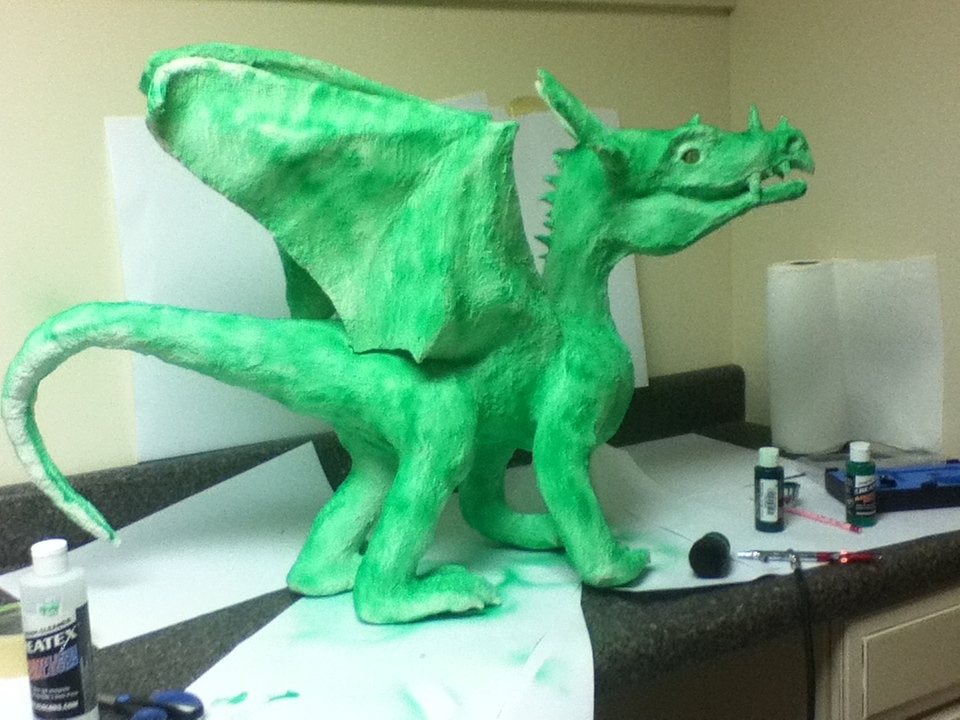
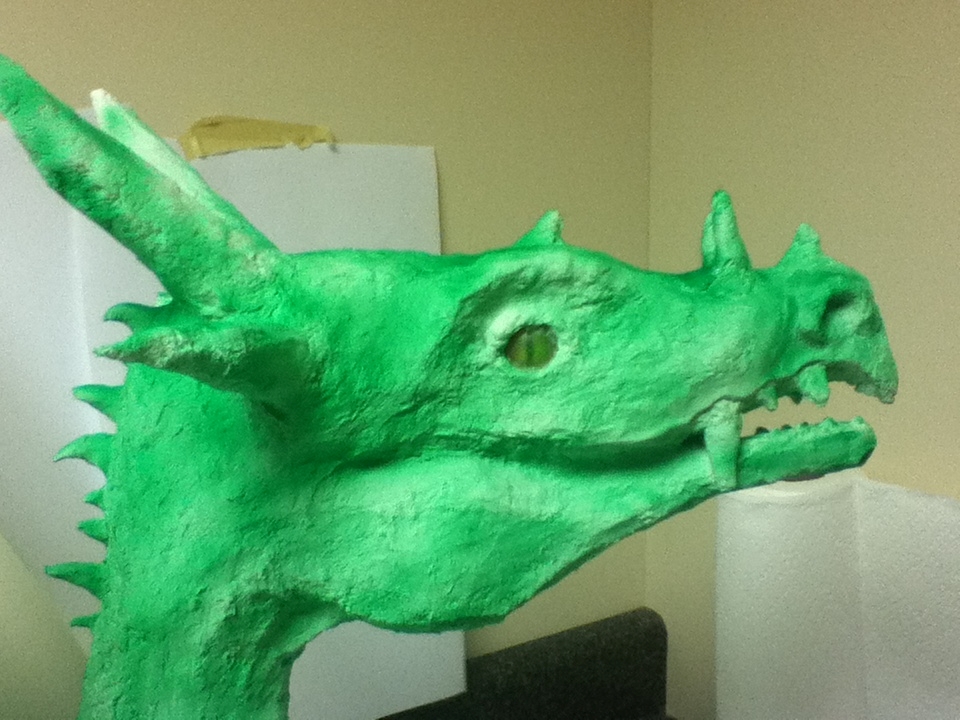
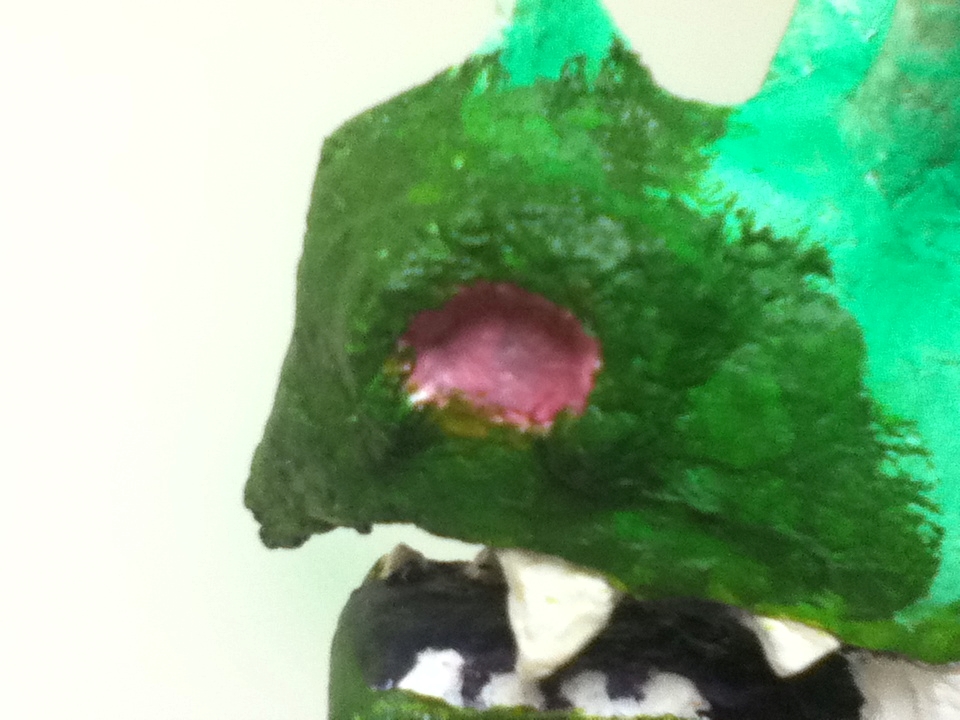
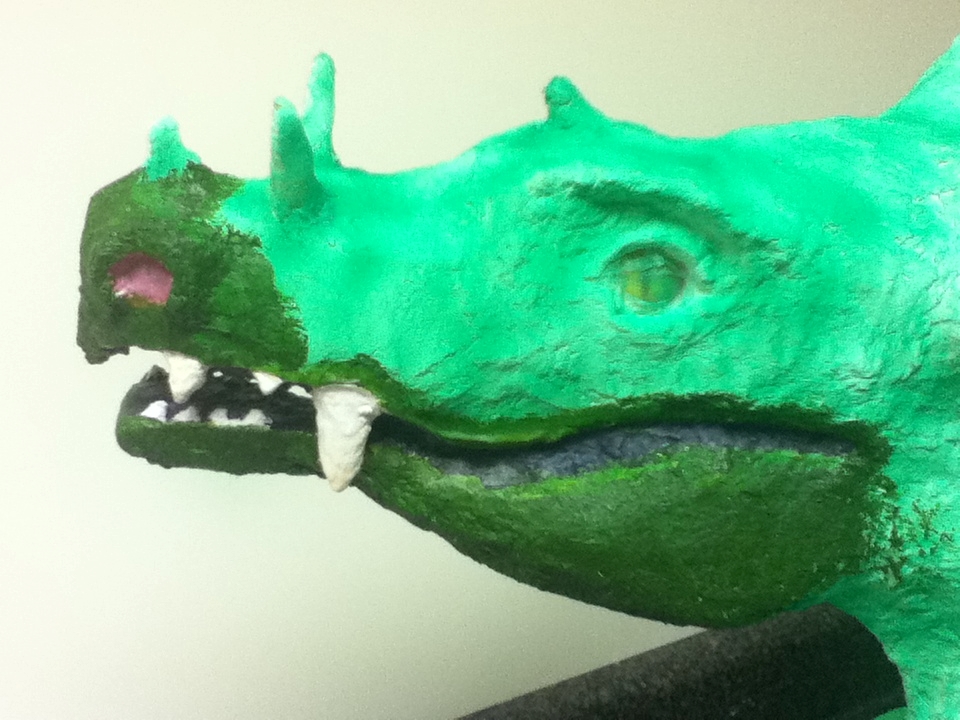
Paper/Leather mask
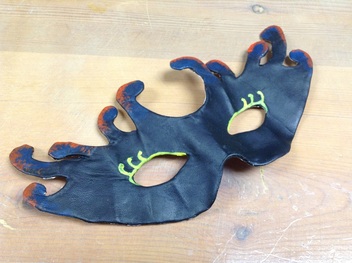
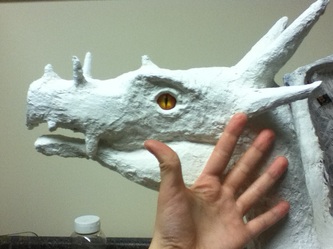
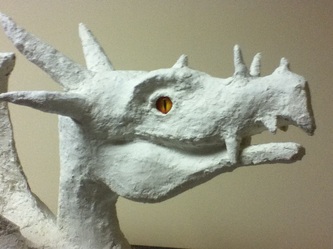
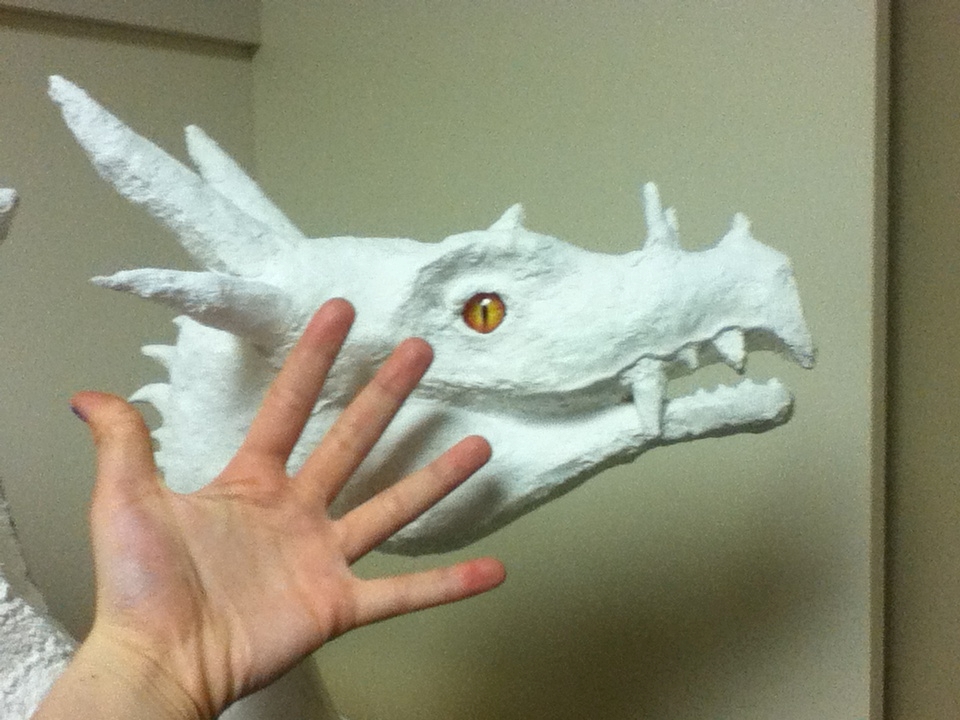
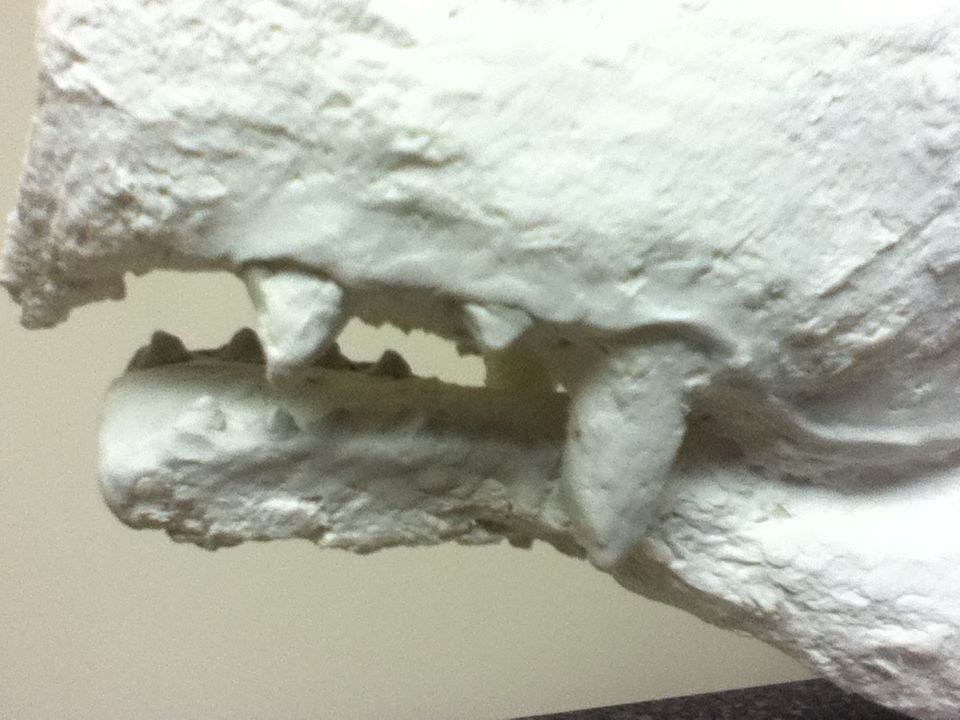
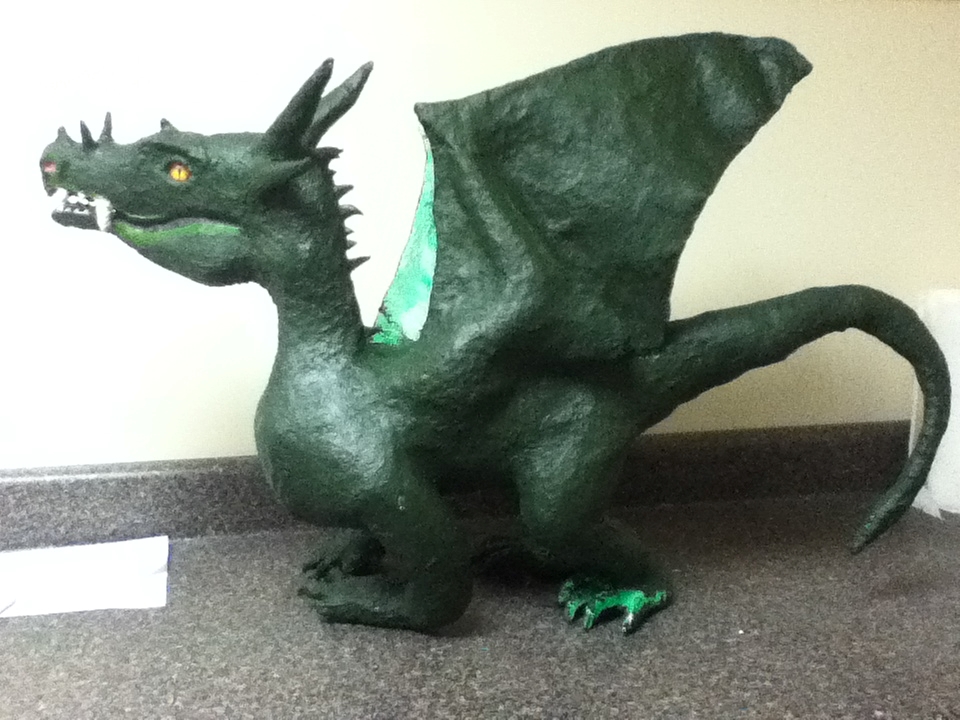
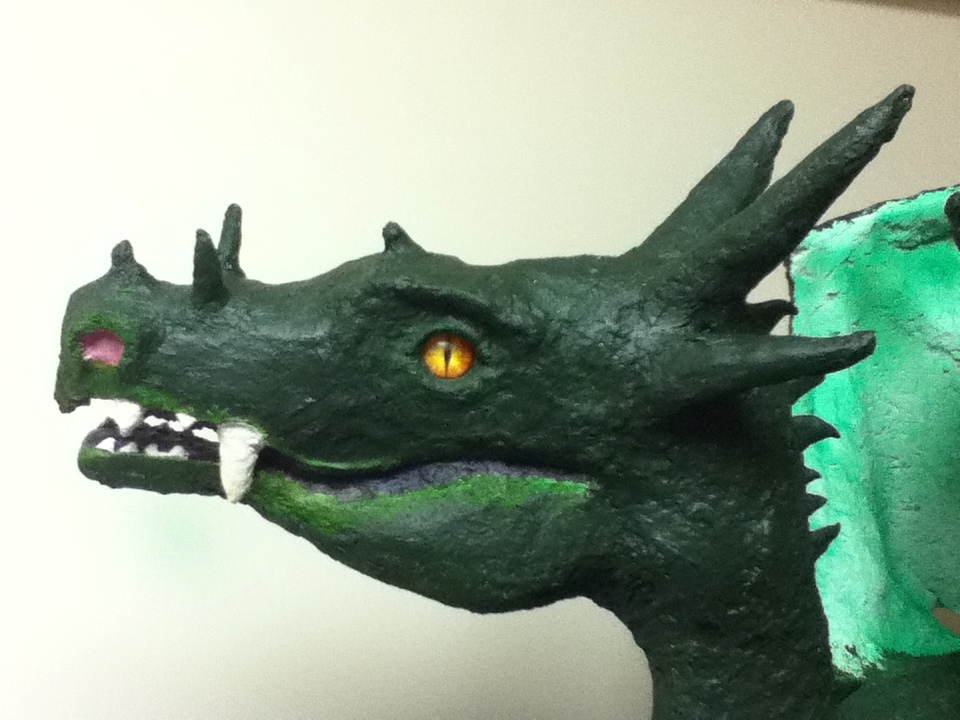
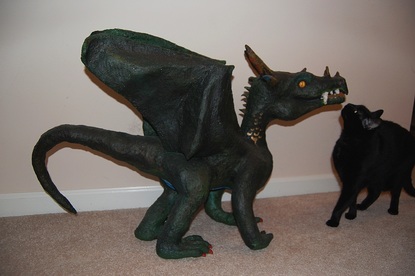
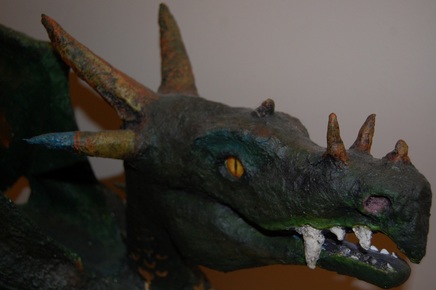
This mask is made out of paper, paper mache clay, paper paste and leather! I was really excited on how well it turned out! I will be making a tutorial on how to make masks sometime soon, but it may have to wait until the dragon is finished!
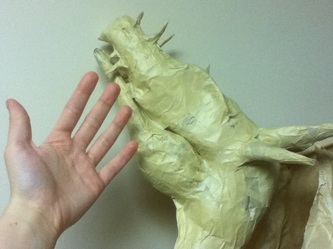
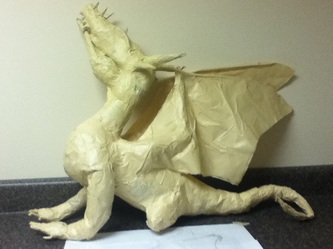
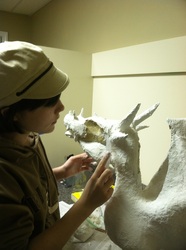
Dragon Sculpture in Process
(slideshow, click arrows or play to see more pics)
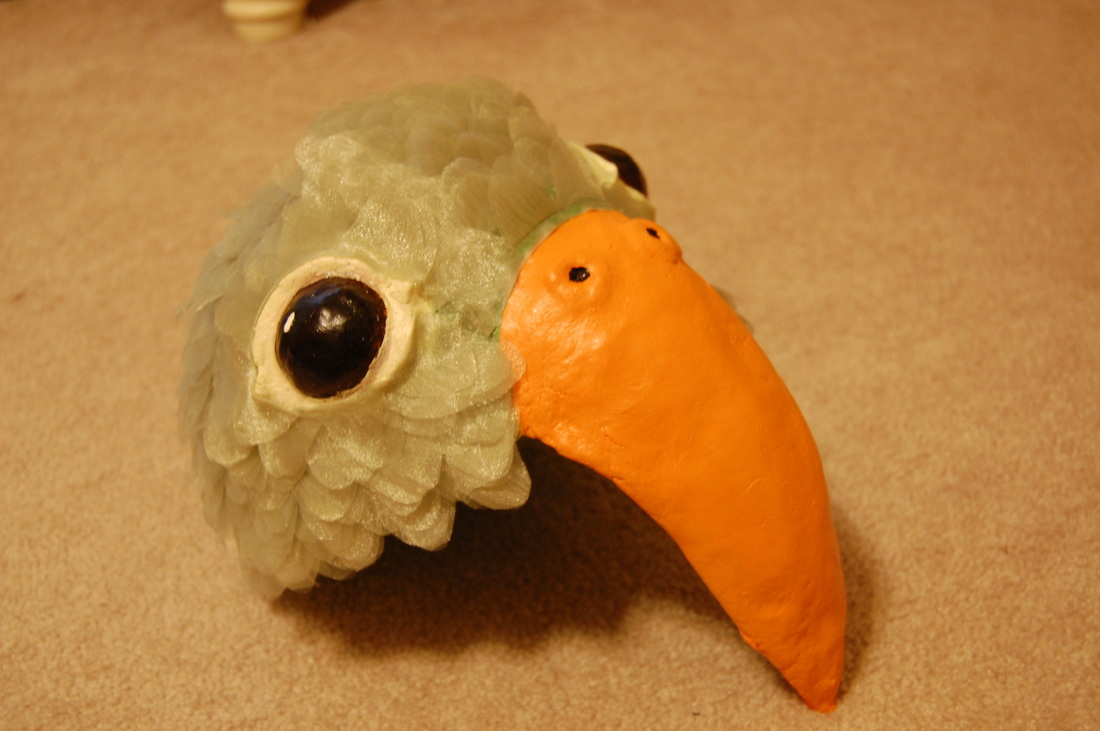
Parrot HeadpieceThis headpiece will be great for any dress-up party:) It took me about a week to make, working on it 1-2 hours a day, so it’s a lengthy project, but worth it!
See tutorial: http://www.marthastewart.com/271594/parrot-headpiece Note: the totorial doesn't say how much organza to buy, I would go with 1 1/2 yards I had a little left over, but its better to have a little to much than a little to little lol:) |
|
|
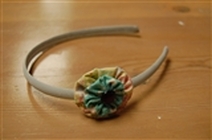
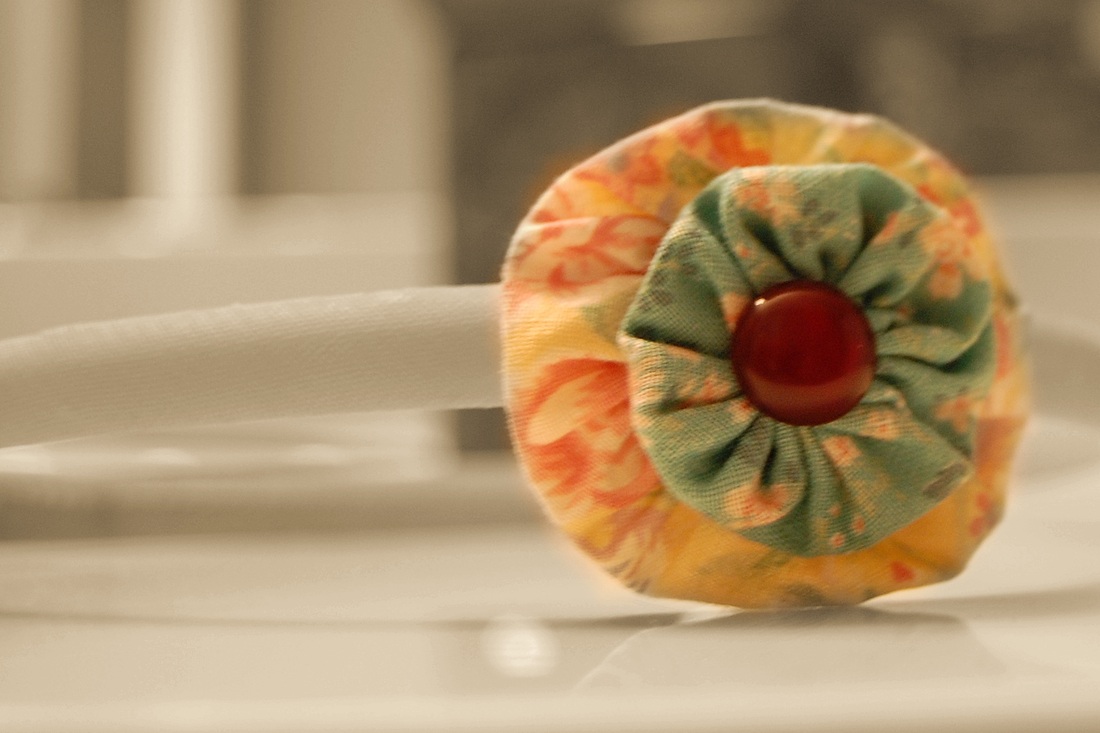
Flower Headband
Need a little something to go with your outfit? Here is the perfect addition to any apparel that takes only minutes to make! All you will need is: 1) two vintage button covers (one smaller than the other) 2) button or bead 3) headband 4) hot glue gun Take your smaller button cover and put dab of hot-glue in the middle of the bunched side, put the button over your dot of glue. Do the same thing to the larger button-cover but this time attach the smaller cover to it instead of a button. On the back of the "flower" put yet another dab of glue and attach to your headband. Wala! your done. Told you it would only take you a couple minutes:) click the button below to view the original how-to. |
Chadwick's Bed
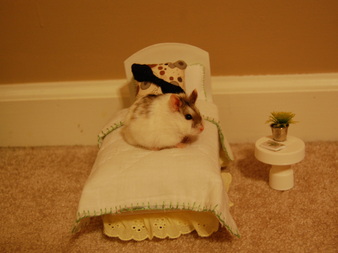
Made a mini bed for Chadwick's "photo-shoot" more pics and directions coming soon!
How to Make Mini Bed
|
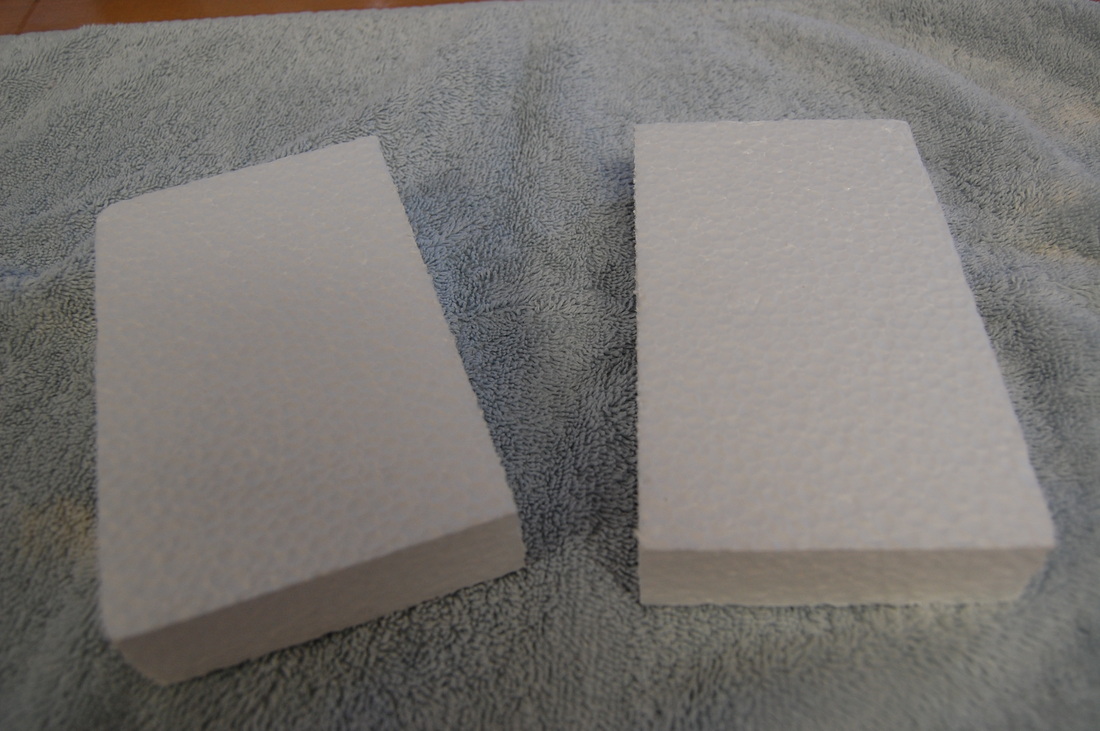
What you will need:
1) one 7 1/2'' piece of foam 2) hot glue and scissors 3) yogurt lid 4) newspaper 5) four tacks 6) cotton inserts (from jewelry gift boxes) or quilting batting 7) white fabric and decorative fabric 8) eyelet lace |
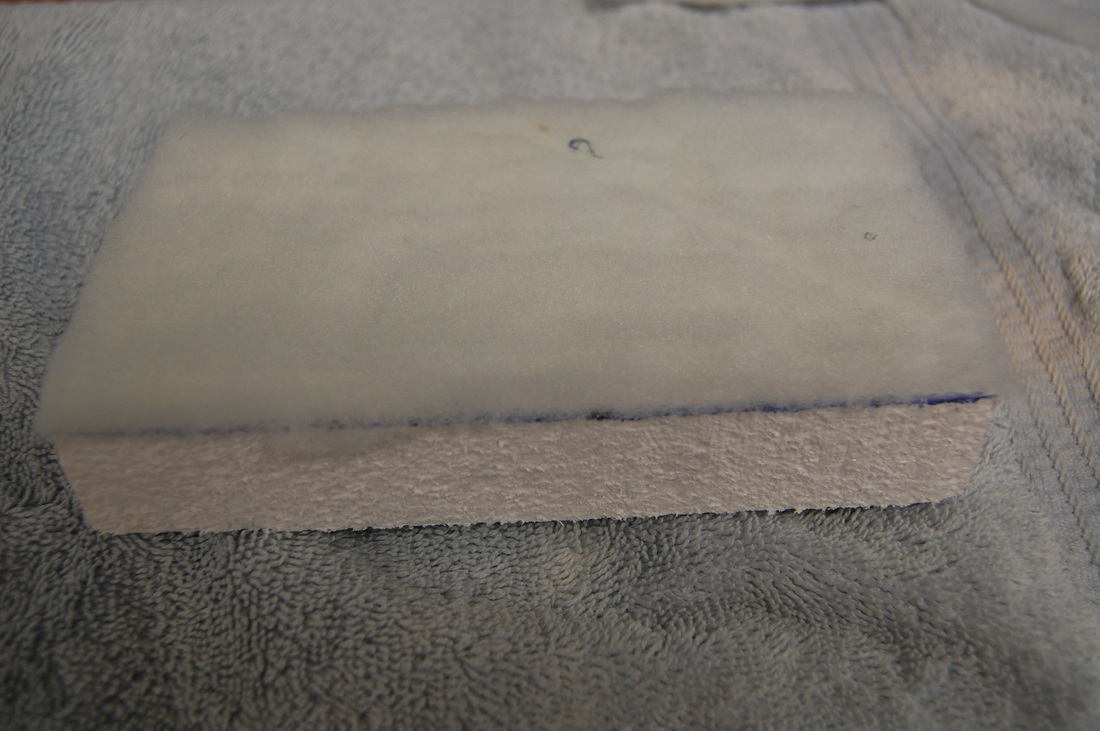
first, cut the 7 1/2 in. piece of foam in half. Take your jewelry box inserts or batting and glue it atop one of the pieces of foam (please use Elmers glue to do this)
|
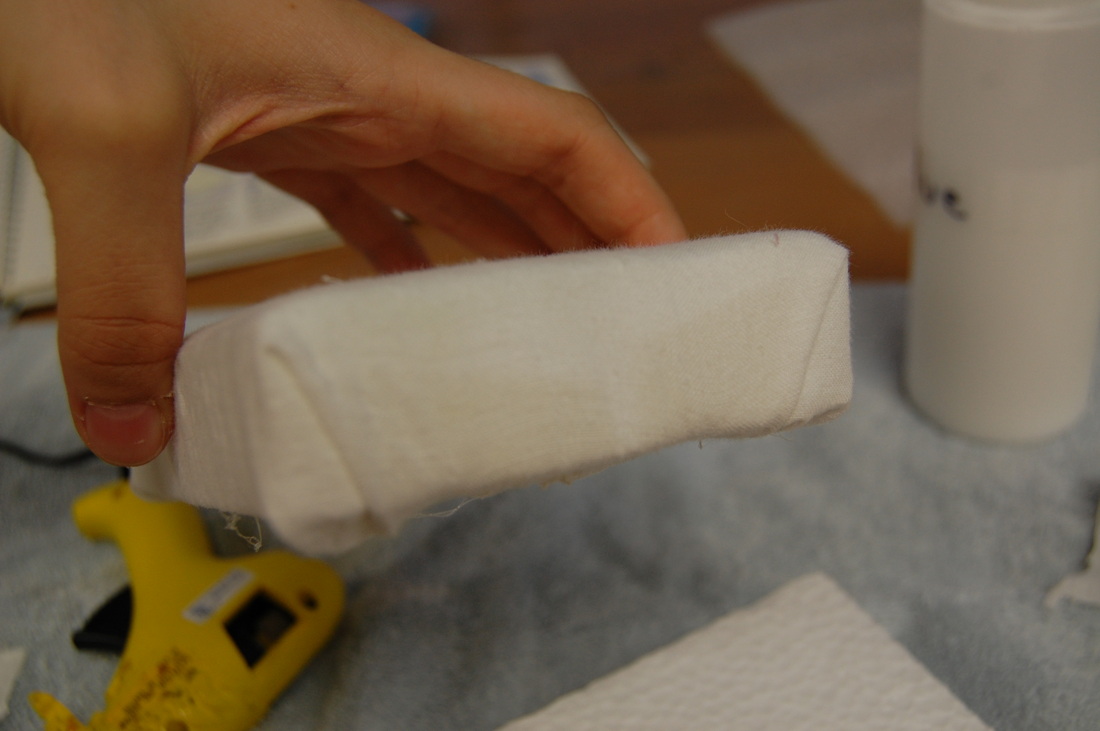
then take the foam with batting on it and one of your pieces of white fabric and fold the fabric on the foam like you would if wrapping a present. across one piece of foam (see picture) glue in place with hot glue (the hot glue will melt the foam a little, ignore this). |
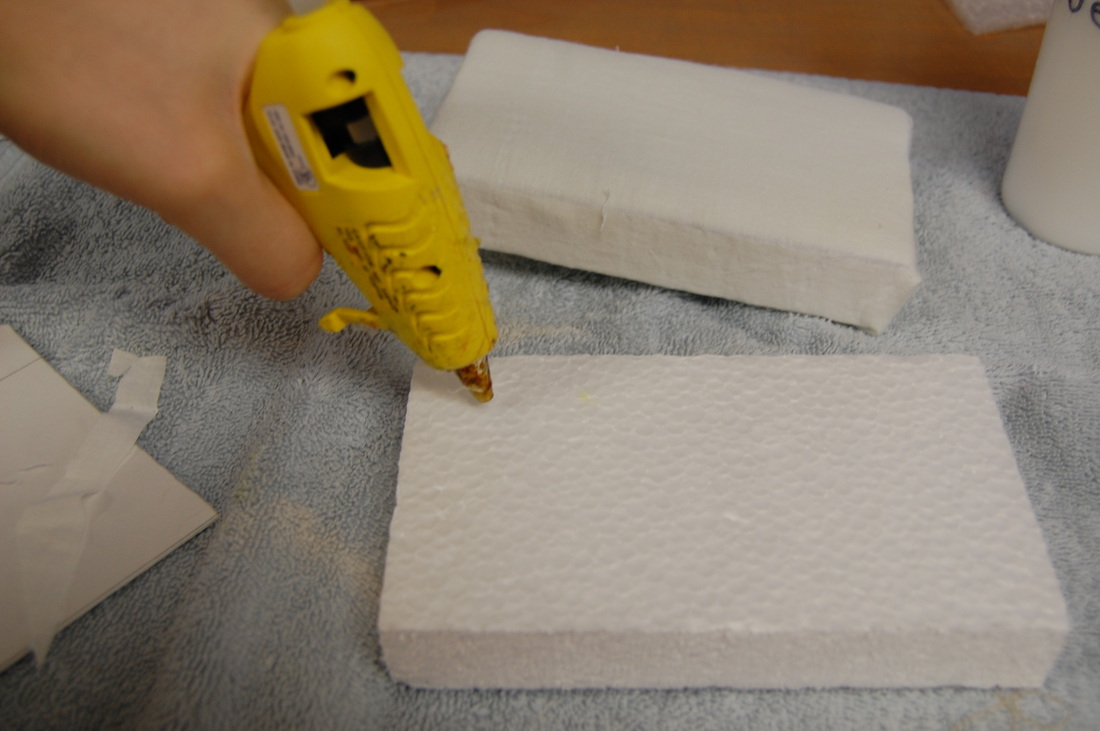
Take your second piece of foam and put some hot glue on top of it. Then quickly place the wrapped piece of foam on top of the glue.
|
Take your yogurt lid and glue it to one of the short ends of the "bed" this will be your headboard. You can also use a round or square cutting from a white paper plate, or you can glue many paper plate cuttings together to make it sturdier.
|
|
|
|
|
|
|
put hot glue on the metal end of the tack (please do not burn yourself!) and stick the tacks into the foam on the bottom of your bed, one for each corner like feet of a bed.
|
now your bed is finished (basically) All you must do now is sew or cut out a
7x8 inch piece of fabric to use as a comforter and sew and stuff a 3 1/2 x 4 inch pillow, good luck! |
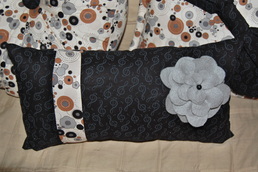
Newest project
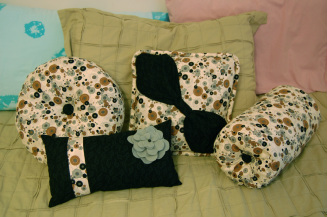
I made these cute pillows over the summer. They were so fun to make and the perfect touch to any room! Below are the instructions to make one of the four designs.
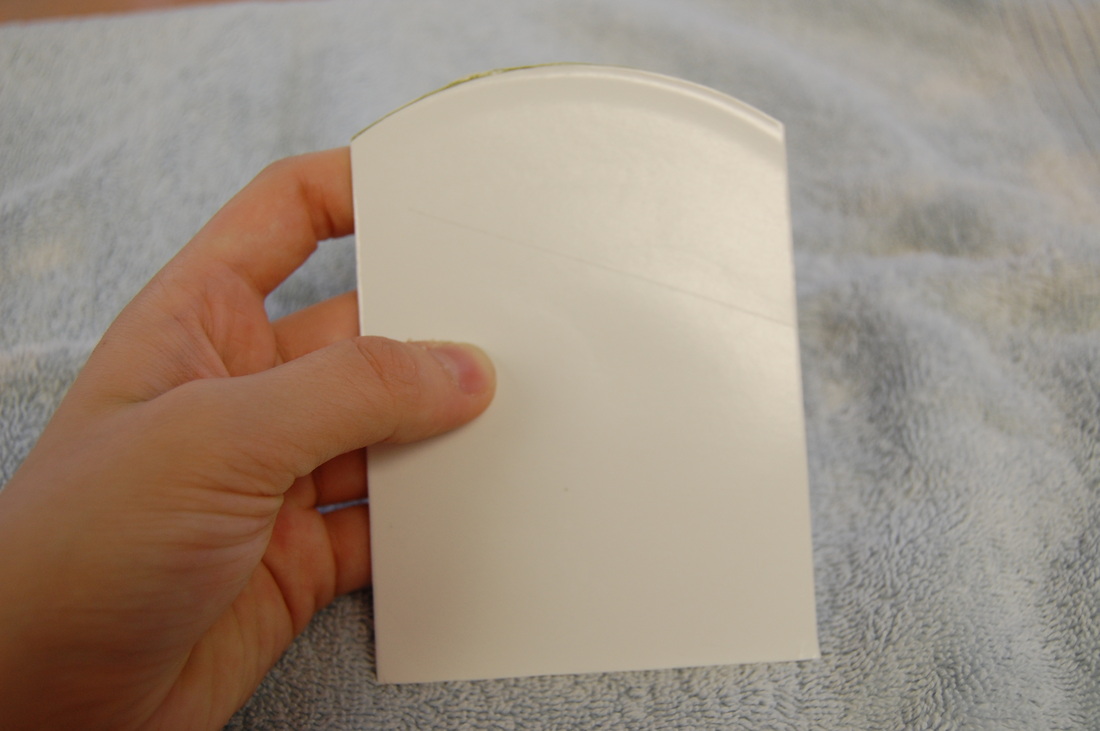
Simple Pillow
you will need:
A 8 1/2 x 14 inch piece of paper (or a measuring tape and sewing chalk)
Two large scraps of your favorite fabrics
A sewing machine
thread
scissors (fabric & paper ones)
Polyester stuffing
This is a fun easy project for any skill level!
I started out with a 8 1/2 x 14 inch piece of paper and pinned it to my desired Fabric (if you do not have this size of paper, just Measure this amount and mark it with sewing chalk or a pencil). after you have pinned on your "pattern" to the fabric, cut around the edges of the paper (like a pattern). After you remove the pattern from the fabric, measure 2 1/2 inches on the edge of the paper pattern and cut with your paper scissors. pin this strip of paper to your alternating fabric, cut 2. Now cut both of your 8 1/2 x 14 inch piece of fabric lengthwise 3 inches from the edge. Now you are done cutting! you should have two 2 1/2 inch alternating fabric strips and your now four pieces of fabric (that were originally two 8 1/2 x 14 inch pieces). . Now for more pinning! pin two pieces of fabric (now 11 inches & 3 inches) wrong side up to both sides of the alternating strip (also do this with the other 11 and 3 inch pieces and strip) Now sew where you pinned. Now you should have two pieces of fabric, both with a alternating fabric strip sewn into them. Now for the easy part! sew the two pieces of your pillow, wrong sides togeather; this will create both sided of your pillow. Leave a small opening wide enough for you do turn your pillow rightside out and stuff with the polyester stuffing. now sew up the small opening! you are done!!!
to learn how to make the flower, go to http://www.thediydish.com/2010/02/how-to-make-chic-pillows-thediydish-on-studio5/
A 8 1/2 x 14 inch piece of paper (or a measuring tape and sewing chalk)
Two large scraps of your favorite fabrics
A sewing machine
thread
scissors (fabric & paper ones)
Polyester stuffing
This is a fun easy project for any skill level!
I started out with a 8 1/2 x 14 inch piece of paper and pinned it to my desired Fabric (if you do not have this size of paper, just Measure this amount and mark it with sewing chalk or a pencil). after you have pinned on your "pattern" to the fabric, cut around the edges of the paper (like a pattern). After you remove the pattern from the fabric, measure 2 1/2 inches on the edge of the paper pattern and cut with your paper scissors. pin this strip of paper to your alternating fabric, cut 2. Now cut both of your 8 1/2 x 14 inch piece of fabric lengthwise 3 inches from the edge. Now you are done cutting! you should have two 2 1/2 inch alternating fabric strips and your now four pieces of fabric (that were originally two 8 1/2 x 14 inch pieces). . Now for more pinning! pin two pieces of fabric (now 11 inches & 3 inches) wrong side up to both sides of the alternating strip (also do this with the other 11 and 3 inch pieces and strip) Now sew where you pinned. Now you should have two pieces of fabric, both with a alternating fabric strip sewn into them. Now for the easy part! sew the two pieces of your pillow, wrong sides togeather; this will create both sided of your pillow. Leave a small opening wide enough for you do turn your pillow rightside out and stuff with the polyester stuffing. now sew up the small opening! you are done!!!
to learn how to make the flower, go to http://www.thediydish.com/2010/02/how-to-make-chic-pillows-thediydish-on-studio5/
